Engine Boring by way of Excessive Honing
(Boring/Honing, or Boning)
"WHY? WHY WOULD SOMEBODY DO THIS?" - Someone, Somewhere, Probably.
This article roughly describes a honing method that allows for at home boring of an engine with no expensive machine tools. It is in no way meant to advocate for this to replace boring(just take it to a machine shop, you maniac). The process itself is very dependent on the quality of the hone tool, as well as the attentiveness of the operator(Boner). Excellent results can be achieved with this process if the operator pays close attention to bore taper and stops to take measurements often.
Before describing the process, It should be noted that this process does not make much economical sense, as the honing tool used(a quality, USA made lisle unit - (Found here)) cost roughly ½ to ¾ the price of a bore and hone job from a machine shop(as well as a hot tank for the block itself) which often comes to around $250(atleast here, locally). I purchased the above linked hone from home depot for roughly half the price that it’s listed at on the lisle website, About $150. I also purchased replacement stones as well. It’s highly recommended to go with a honing tool that has replaceable stones. It’s not a question of IF you’re going to accidentally hit the block webbing and crack a stone, it’s WHEN. It’s incredibly easy to over extend the hone too far into the block and stop the drill dead in it’s tracks. This will almost guarantee a broken or chipped stone. If you’re using a very cheap non-replaceable stone honing tool from a place like Advance Auto or AutoZone, this will scrap the entire tool(A very expensive affair, if you’re the type to not hold onto receipts). A quick fix that I employed for cracked stones on my hone was to put them back together with superglue as an adhesive(only if you have no oil on the stones). You'll have to redress the stone to be parallel after the glue is allowed to cure overnight.
Now onto the process itself. There’s a couple problems to be aware of before jumping straight into boning the block out. Namely avoiding two things: Bore taper and egg shaped cylinders(middle of bore larger in diameter than either end). As for egg shaped cylinders, Refer to the diagram below to figure out whats going on.
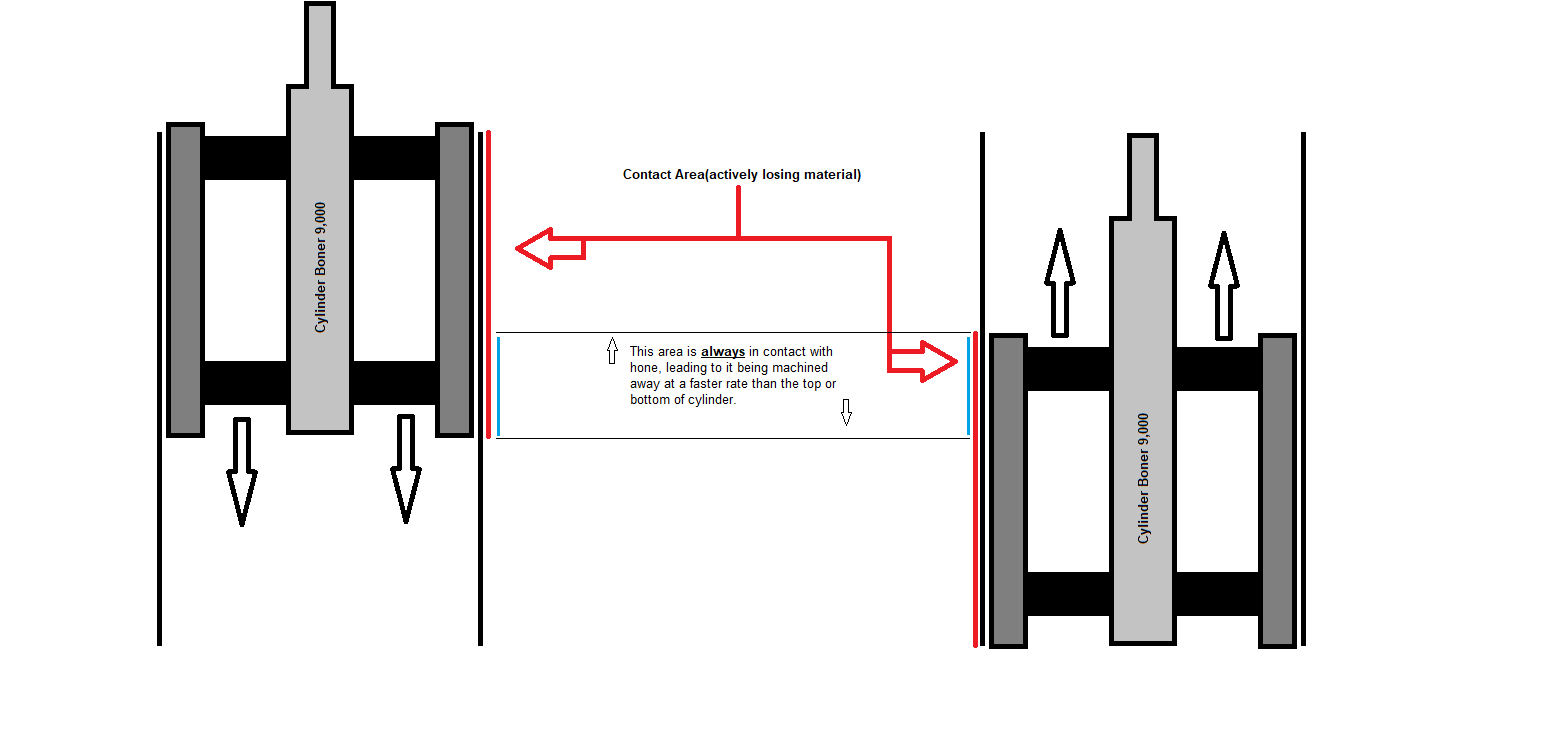
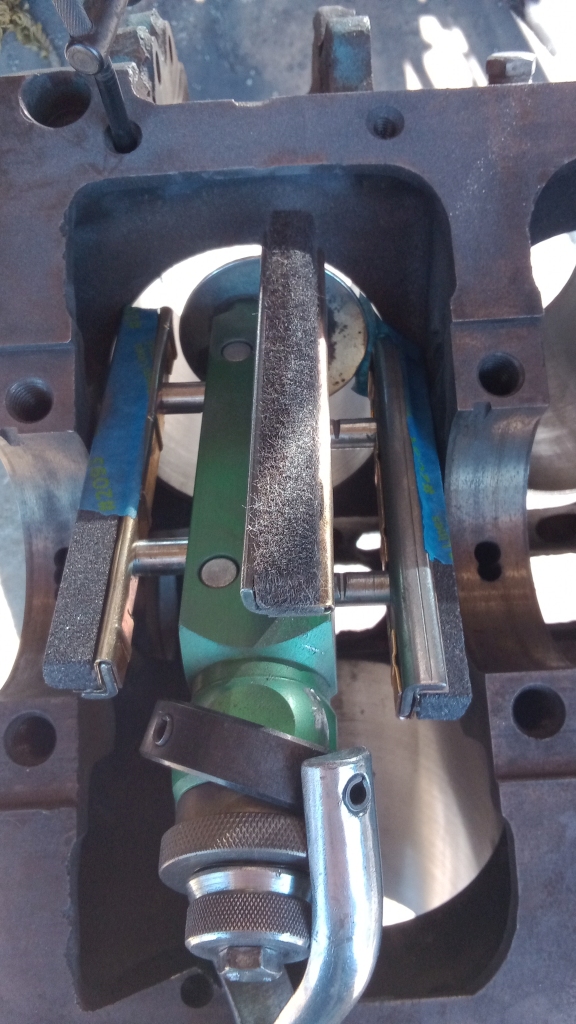
Although this isn't a big problem if you're honing an engine as intended(bored first and last few thousandths honed out), this problem will stack with itself as you remove more and more material from the cylinder walls. In order to avoid this problem, you need to keep the stone overlap area as small as possible during honing, and keep stone pressure to a light or medium cut only(only possible on the style of hone I am using). Depending on the length of your hone as well as the length of the cylinder, this may be impossible to completely get rid of. In that case, Just keep an eye on the overall dimensions of the bore as you’re honing, and keep it to a light or medium cut. Often enough this will be sufficient to keep the cylinder bore relatively straight, free of taper, and non-egg shaped. You can also dress the stones in such a way that only the top and middle of the stone will contact the bore. This will reduce the effective length of your honing tool. This may be desirable depending on your setup, But I didn't need to do this. Another, easier way is to just tape the bottom end of the stones off with masking tape. This will also prevent them from cutting. Keep it to one layer of tape only if you do this. Example Pic shown below.
After you're done, if you have any adhesive or tape ground into the stone pores, a steel brush dipped in acetone will make quick work of it.
You can start first through the top. I’ve found with my hone(even after dressing the stones to within roughly .005” parallel to each other), Working the cylinder through the top will cut through the top faster than the bottom(taper), so once the middle and top of the cylinder are within roughly .005” of the final desired size, You can flip the engine over and go in through the bottom. You should actively monitor the dimensions of the cylinder in atleast 3 points. The bottom, center, and top. In my case I found .005" was about the right number. Depending on how your hone is cutting, you may need to stop sooner(i.e. a cylinder that's almost to size at the top, but significantly smaller in diameter in the bottom. you should redress your stones, too, if that's the case) or stop later(very little taper). Stopping sooner and flipping the block will only take up more time. If you stop too late and end up cutting too much, you'll end up with a sloppy, severely tapered cylinder.

Particular Points of interest:
The following things are what I have learned during this process. Points of interest that should be kept in mind during the boning process.
-The bulk removal process is done dry, without oil. This prevents the stones from clogging and ceasing to cut.
-With my hone in particular, I’m using 80 grit stones for the bulk material removal. Once the cylinder is within .002”(or in that neighborhood) of the final desired size(or until the pistons *just* slip into the cylinders with a small amount of resistance(please clean the cylinder before fitting any pistons!), I switch to 220 grit stones and add oil to the cylinder to improve surface finish.
-A dial bore gauge is highly recommended for this. Those telescoping "T-Handle" hole gauges are NOT an accurate means of measuring a cylinder bore.
-After the cylinder is at it’s final desired size, and the cylinder is dressed to the desired surface finish, A dingleball hone is used to produce the desired crosshatch pattern.
-The formula to find the desired RPM of the drill(as per my hone tool instructions) is 1200 ÷ bore size. For a chrysler 318 bored .020” over(in my case) This comes out to 1200 ÷ 3.9262 = 305 RPM.
-Do not stress on the RPM too much, but try to keep it at a reasonable level. Fortunately for me the drill I’m using is a gear reduction drill that runs at 500RPM. This is close enough. If your drill is a more modern, higher RPM unit, You’ll probably have to vary the trigger. You could also try making a trigger hold plate using a couple long bolts, nuts, and a metal strap across the trigger to keep the drill at your desired speed.
-This is an extremely dusty process, and you will have to thoroughly clean your block after this is over. Do not, under any circumstances perform this procedure on a greasy block. The grease will hold the abrasive dust and will be extremely difficult to clean out completely. I let my block soak in (lightly diluted) purple degreaser over the course of a few days, and then wire wheeled the majority of the inside of the block.
-After the process was over with I blew as much of the dust out of the block as possible with 150 pounds of compressed air(INCLUDING OIL GALLEYS AND COOLING JACKETS!), afterwards, I gave every surface I could reach by hand a thorough wipe with an acetone soaked rag, as well as took bore brushes to the oil galleys.
-Each cylinder takes roughly an hour to bring up to size(with stopping the hone, measuring the bore with a dial bore gauge, repeating etc), with an 8 cylinder being roughly an 8 hour process. This is definitely something you’ll want to split up over the course of a couple days.
Final Results
Final results of the boning technique:
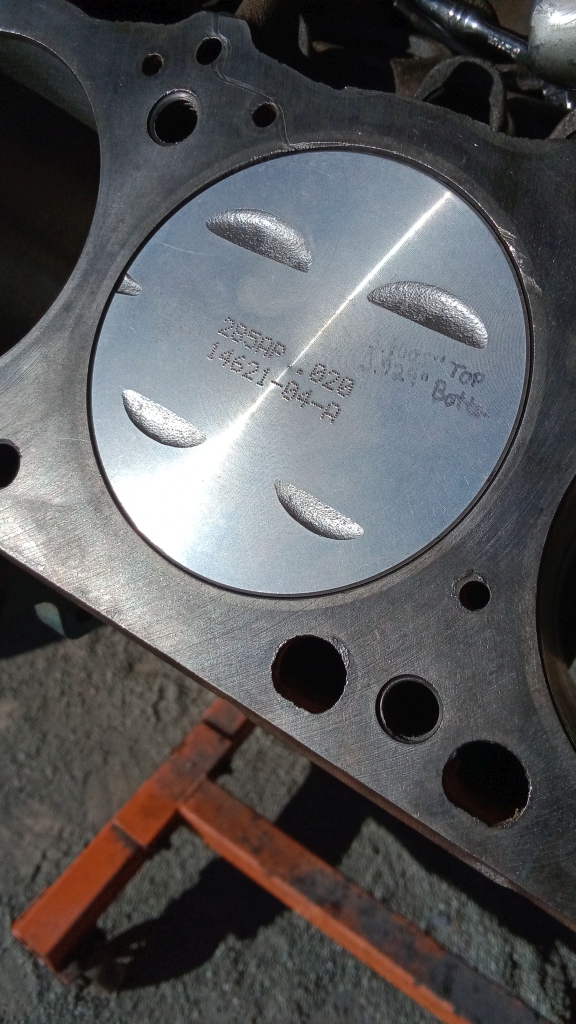
A piston that fits neatly into it's hole.
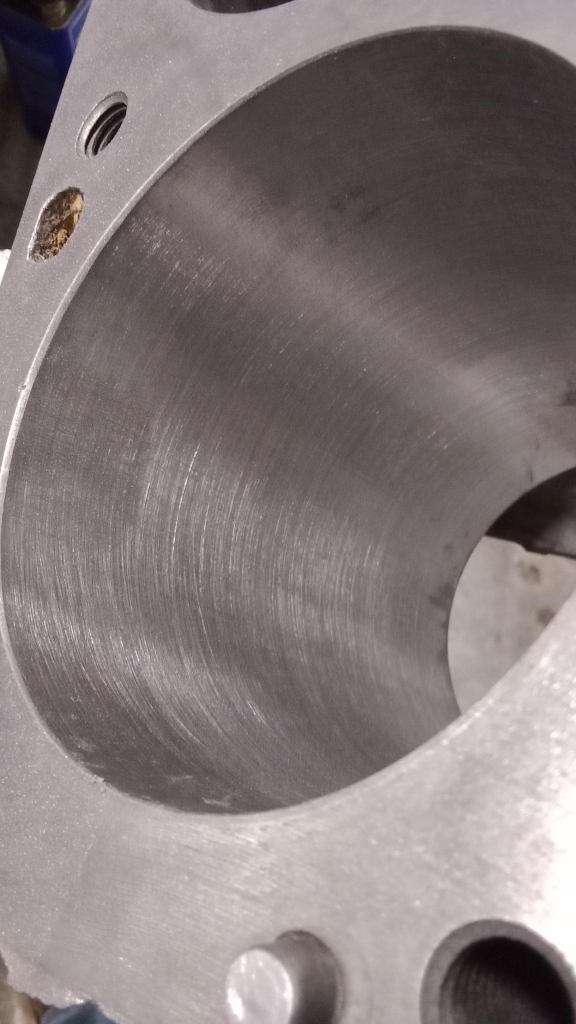
A picture of a cylinder:
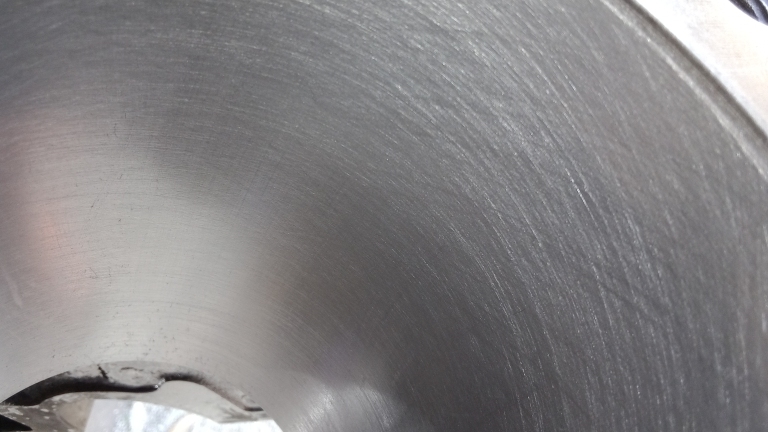
This is after applying the higher grit stones and running them with oil, as well as running a dingleball hone down the bore at a low RPM and high feedrate. The angle is relatively close to the desired 45 degrees, I may touch up the cross hatching further. The cylinders themselves are dimensionally OK, But I'm not 100% on how "deep" the cross hatch from the dingleball hone actually went as I can still see some horizontal lines from the roughing and finishing hone in certain spots on the cylinders, namely toward the bottom. This picture is after running the dingleball hone for roughly 5 minutes per cylinder with a very liberal dose of WD-40 and ATF as the cutting fluids.
The majority of the cylinders ended up to within .001” to .002” total bore taper(top to bottom), .001” to .002” concentricity(roundness), and with an egg shape(for lack of a better word) of about .002” in most of them, some better(perfect) and some worse(.003” to .004” larger in the middle) The very first cylinder I performed this boning technique on is the absolute worst as far as egg shape goes. I cut too much without bothering to measure and ended up with about .005 - .006” larger in the middle(whoopsie). You must possess a great deal of patience if you want this process to give you good results. I obviously got impatient and didn't measure often enough.
The first two cylinders are the worst in terms of bore taper and egg shapedness. I consider these two the “learning” cylinders, as I was still reasoning out the process as I went along. The worst of the worst is around .005” larger in the center than at the top or bottom, and has a taper of about .005” from top to bottom(bottom being smaller).
Final Thoughts
This process can definitely produce a perfectly serviceable block for a perfectly serviceable home rebuild(if you don't screw it up). I went .020” over stock for this particular rebuild as the bore wear was fairly excessive. The success or failure of this endeavor largely boils down to technique and patience, with bad technique landing you with a cylinder most likely similar to the above mentioned “learning” cylinders.
Though it would definitely be more economical to just take the block to a machine shop to have it bored with a mill or a similar machine tool, This technique is still perfectly fine for a home rebuild, and can be employed if you wish to do everything yourself on the block, or if you wish to save maybe $50-$100(and you enjoy being an absolute masochist), you may want to seriously consider this process. But in the majority of cases, you should probably just take the block to a shop. I didn’t do that because I tend to make things difficult for myself. I wrote this article mainly because I could not find anyone else who has done this(why would they?) that also provided details into the process itself. Hopefully if someone wants to attempt this themselves, they can learn from my mistakes and produce better, more consistent results cylinder to cylinder. Either way, I'm running the 318 regardless of if the cylinders aren't consistent relative to each other. I may get a little more blowby from those two 'learning' cylinders, But I don't anticipate any smoking or oil burning from this rebuild due to those cylinders. Things don't have to be picture perfect to work perfectly fine, and this is not going to be a high performance race engine. Infact I doubt this engine will ever see past 3,500 - 4,000 RPM.
Misc. Pics that didn't fit anywhere else below:
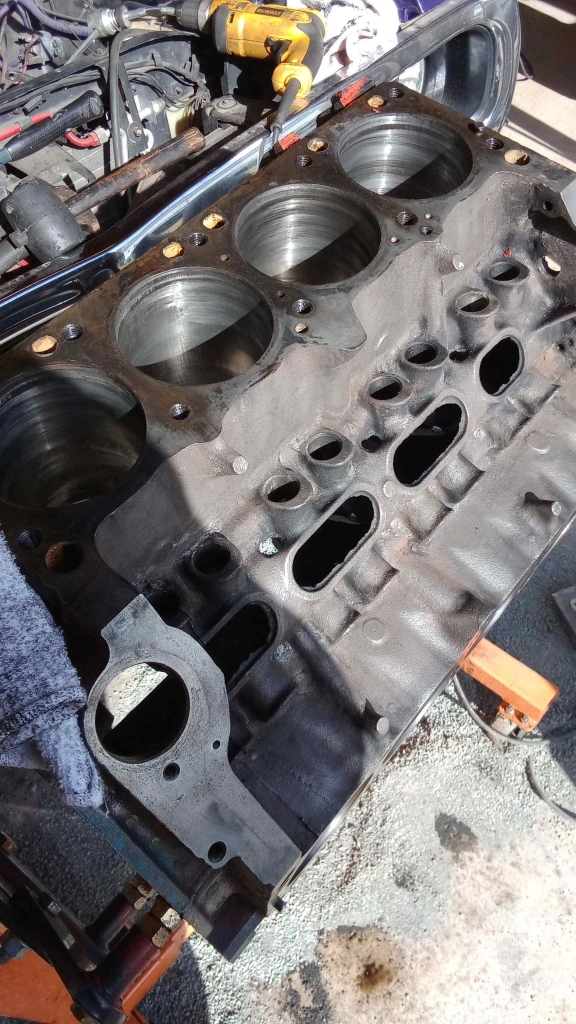
The state of the cylinders prior to purchasing the better honing tool
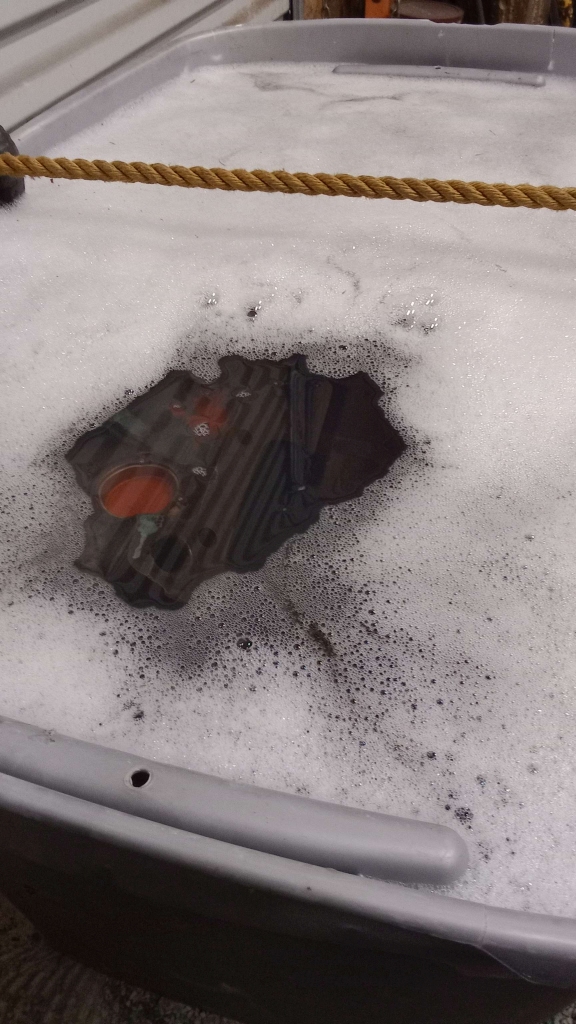
Soaking the block. I used two gallons of purple degreaser. Purchased from home depot for about $12/gallon. The rest is diluted with water.
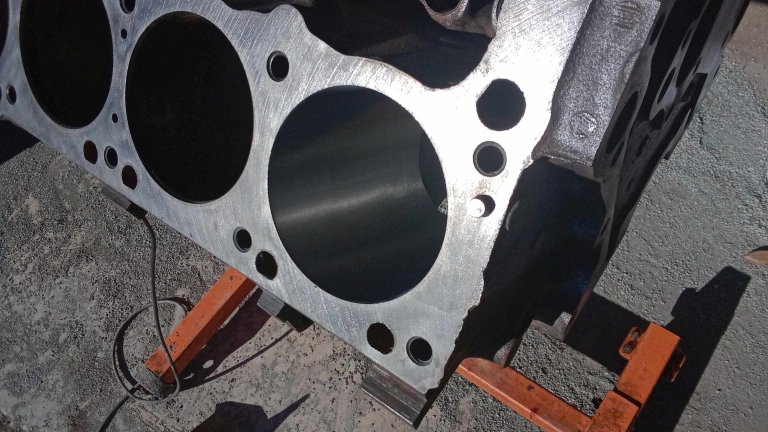
A picture of a cylinder post honing. I have yet to run the dingleball hone to produce the crosshatch in this picture.
A slightly better picture of a cylinder post rough/bulk honing. I have yet to run the finer stones through nor dingleball hone to produce the crosshatch in this picture.