A post apocalyptic automatic to manual swap
The love that was never meant to be: A small block Chevy mated to a Chrysler NP435 4 speed.
A simple documentation on swapping in a Chrysler np435 transmission into what once held a GM 700r4 automatic, using as little money as possible in the process. The reason I went this particularly difficult way is a simple one. Manuals in America are dead, and this is very easy to see in junkyards above all. I would have happily pulled a GM manual trans and been happily on my way to installing it. BUT, The few manuals left in junk cars are often pulled and sold separately on the used market before the car is even scrapped(for way more money than I’d care to spend). I trolled my entire local pick and pull, of all makes and models and found a total of three manual transmissions out of a few hundred vehicles in their inventory. Two were NP435 manuals in dodge trucks, and the last one was a FWD 4 cylinder car. Anyway, onto the details.
The bellhousing
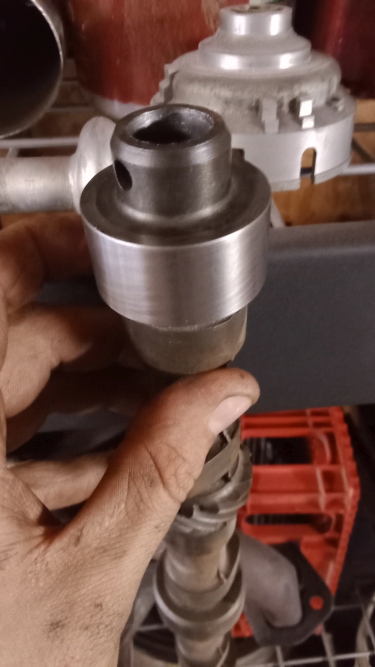
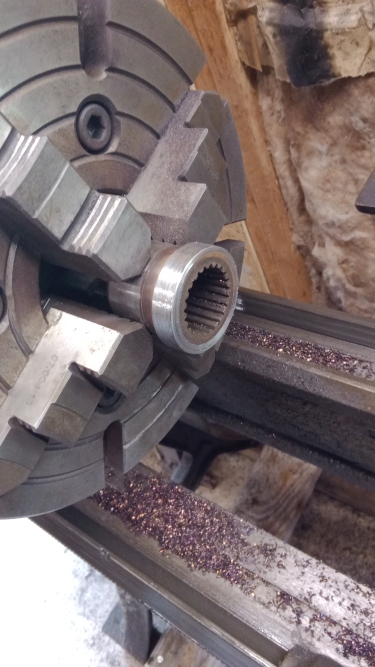
I checked out prices of aftermarket SBC >> NP435 adapter bells online, there’s no way I’m paying $400+ for just a bellhousing. Instead I decided to fabricate one out of sheet steel. The sheet I ended up using was 16 gauge, along with 1 inch C-channel(1/8” thick). In order to even begin making the bellhousing, I needed to first obtain a pilot bushing that can register the trans against the flywheel in the correct location. Since not too many people are doing this, and mcmaster carr is fairly cost prohibitive for a bushing I would ultimately have to machine anyway, I decided to make my own. The first was made from a chunk of polyethylene for mockup purposes only(not pictured). The second was made out of cast iron, which was sourced from a flat tappet camshaft(oil journal). OD is 1.700”(SBC flywheel ID), ID is .750”(NP435 input shaft OD). Total part length is .820”. Pictures follow.
camshaft journal, camshaft zipped into two
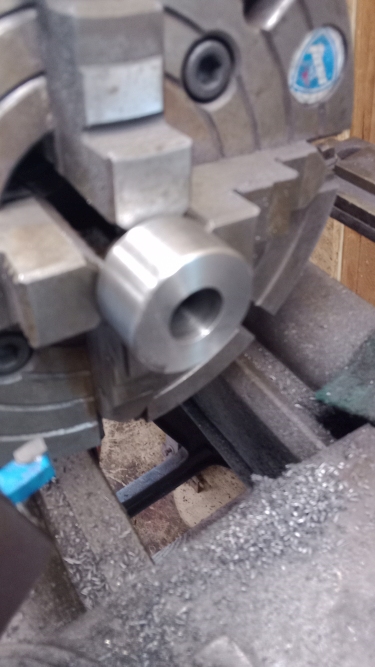
chucked into lathe, mostly machined
The fresh camshaft bushing, fits OK. Snug on the flywheel end(OD), My ¾” drill bit hogged the hole out a few thou over intended. I need a small hole boring bar.
After the bushing was machined, I was finally able to put the motor and trans together. I eyeballed the hell out of alignment, measured every possible measurement, and began to layout the bellhousing in cardboard.
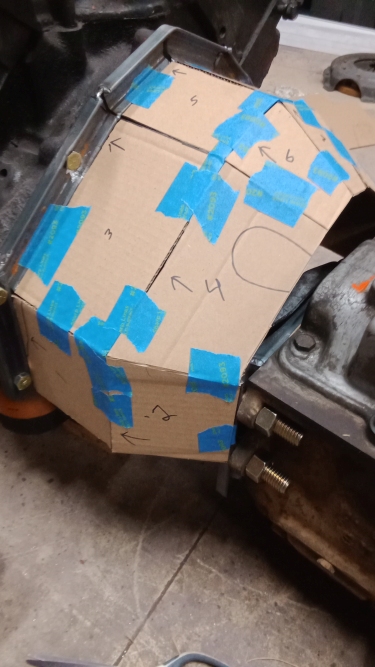
It’s probably common sense, but numbering the templates and providing arrows for orientation will make it a lot easier on you when the time comes to cut the steel and place it in the right spot. After all that, I cut out the steel templates and begin tacking them.
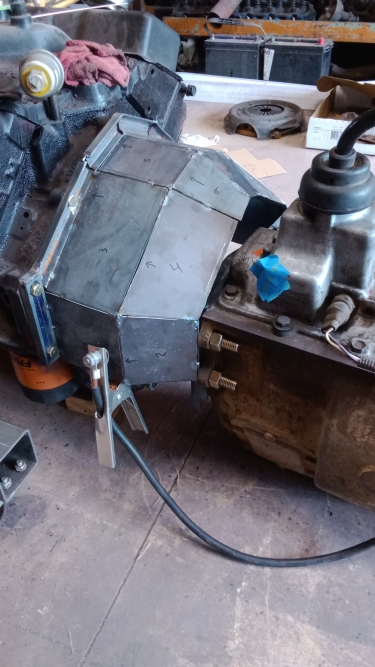
Bellhousing tack welded
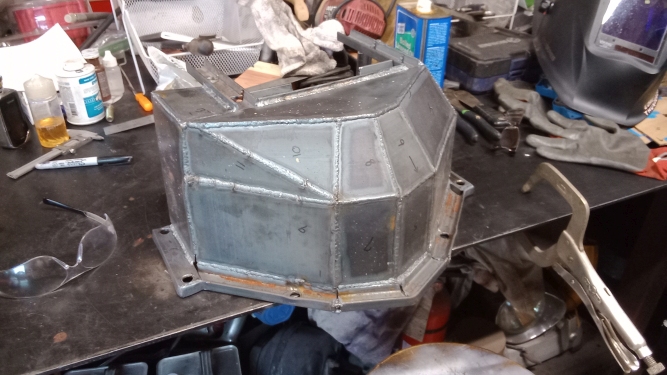
detached and moved to workbench to finish off most of the welding
Finished, Painted, and attached to 435
That’s about it as far as the bellhousing. Some heat warpage was expected, and as expected, it did warp a small amount, and some drilling of the bolt holes for the purpose of embiggening was required, but the motor and transmission are still aligned enough to where it doesn’t matter, so whatever
Part fitment
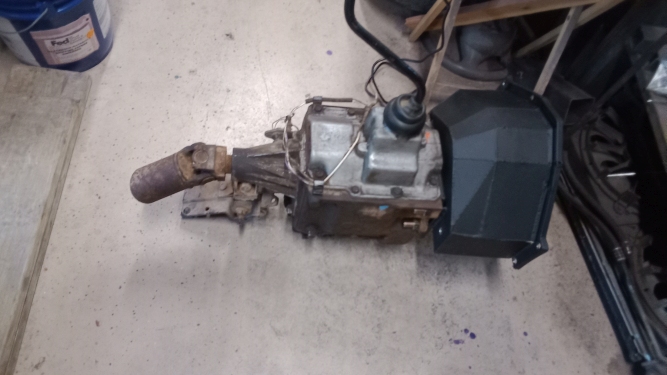
I lucked out with flywheel fitment. It turns out a small block Chevy flywheel is 100% compatible with a pressure plate and clutch from a 1990 dodge d150, no drilling or modifications required. The transmission crossmember fit like an absolute dream as well. It held the 435 at the correct angle, and the only thing that was required to fit it onto the new transmission was the drilling of two bolt holes. This does mean I ended up with a solid transmission mount. I might shim it with some shaved down hockey pucks later. Not sure yet.
Parts that required fitment
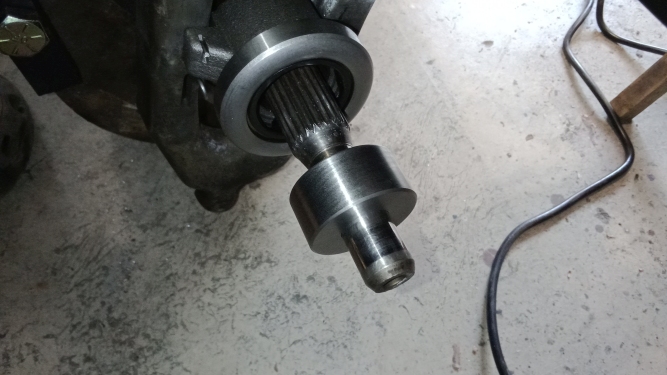
Since The NP435 transmission isn’t equipped with a slip yoke output shaft, I needed to get ‘clever’ with the driveshaft setup that originally went to the GM 700r4. Thankfully, the 435 is substantially shorter than the 700r4, so no modifications were needed to the driveshaft itself. However, this does necessitate making an extension/adapter to fit a shorter, non-slip yoke transmission onto a slipyoke driveshaft. Thankfully, I just bought a lathe(a beautiful 1930s 13” southbend). Pictures of my half baked solution for this problem follow
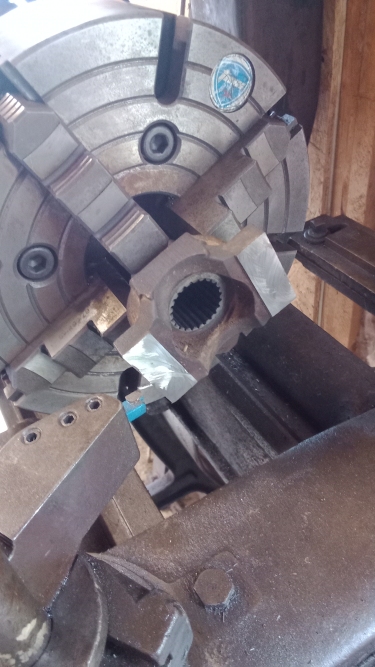
The output shaft chucked in the lathe. The fresh cuts are where the half circles were for the u joint, they were accomplished with a zip disk on an angle grinder.
The same output shaft, drastically reduced in diameter to slip inside some thickwall tubing I had on hand.

Post welding. After each and every tack, I stopped welding, Took it to the lathe, and indicated the machined surface in and then tested the end of the pipe for runout and made adjustments when necessary. This took absolutely forever to do. I’m fairly sure this part is cast iron(probably forged?), All I know is that it felt like and welded like cast iron. That joke of a weld isn’t mig, it’s TIG.

After all that was done, I unbolted the tailshaft housing of the 700r4, hacked off the tailshaft with a zip disk, cleaned it up a bit on the lathe, and proceeded to weld in the 700r4 output shaft onto my franken adapter. I did have to make a mild steel bushing to fit the smaller OD shaft into the larger ID tubing. I used whatever was handy. The procedure for this welding is the same as above. Tack, indicate on lathe, adjust, tack, etc. The total indicated runout after finishing the welds and letting the part cool was around .007”. I called this good because I didn’t want to put myself through that ordeal again.
The clutch lever
The clutch lever ended up being a rather simple ordeal that was made to be complicated because of myself. I spent a couple days on a super slick system of cables, levers, and a custom made shorty clutch pedal that resulted in a pedal pressure that only superman could properly operate. After realizing my retardedness, I re-embraced the K.I.S.S. principle and made a single larger lever that a cable could hook up to via a bolt and a few washers.
The clutch pedal situation
This is where you may ask an obvious question: “But what about the clutch pedal?” Well, I unhooked the emergency brake cable, rerouted the cable toward the transmission, hooked it up to the clutch lever, and disabled the locking mechanism at the pedal. “Isn’t that a bit far to the left?” Yes. “Don’t you need a parking brake with a manual?” Also yes. I’m going to install a handbrake instead. For now a brick at the tire will do. We will speak of this no further, I’m not proud of it.
Balancing the adapter
Much to everyone’s
surprise I’m sure, the driveshaft adapter I made with .007”
runout is a bit out of balance. After road testing, I found any speed
over about 20MPH would result in a wee bit of a transmission wobble
that got so much worse the faster I went(max testing speed being
about 30MPH with this death wobble). I solved this in the stupidest
simplest way possible; with hose clamps. I put the vehicle up on jack
stands so the rear tires were in the air, unbolted
the transmission from the crossmember for maximum wobbly-ness, then
started the motor, shoved
it into 4th
gear, and let it idle. I
crawled under and carefully held a
paint marker toward the adapter, intending to only just barely scrape
it against the OD. Once I had my markings, it was as simple as
clamping a very small weight down with a hose clamp 180°
opposite of the paint marking. You can really only guess at what
weight is needed to balance everything out with this technique, so
some trial and error is required. Once I had it balanced at idle, I
slowly increased the idle speed and watched for higher speed wobbles.
I found a few, so some more adjustments were needed. The most you can
do is just play around with the weight of the counterbalance and the
clocking of the hose clamp. It doesn’t take much to make a
large effect at higher speeds. Eventually I got the vibrations down
to a more
reasonable level. I bolted the trans back onto the crossmember and
called it good.
Concerning the safety of the driveshaft adapter
I installed a driveshaft loop at the transmission.
(PIC OF DRIVESHAFT LOOP)
Total cost
The transmission was about $130 at the junkyard.
The flywheel was an additional $100
The clutch and pressure plate kit was about $100
I’m estimating the total cost of steel for this to be around $20(I had stocked up on it before prices shot through the roof in 2020 and they still haven’t come back down)
So the total cost was about three fiddy(no shit)